
Creating a Safe and Colorful Environment for Students - Berline Exume, 130 TESS
Upon arriving to my school, the first thing I asked for was a classroom or anything that could potentially be used as one. More than anything, I knew that I had to have a designated space to teach in, that I could call my own. I did not want to have to trudge all my belongings from one class to the next, and I desperately wanted a space that my students and I felt belonged to us, specifically, to learn in.
While I was working as a teacher in the states, I did not have a classroom and it caused so much unnecessary stress and dysfunction. I really did not want to have to go through that again. Initially, my school did not have a “classroom” for me, but what they did have was a storage room full with old desks and chairs that were waiting to be taken to the dumpster. Without any hesitation, I begged for that room and luckily, I got it. When I first walked into that room, it was a cement box, with an old rinky dinky television, old desks and a whole lot of dust – I was happy.
My school had not yet set up a budget for me, so there was no money for me to go out and buy things so I had to get extra creative and plan properly. These are a few of the action steps that I took before starting the process:
Step 1: Set aside any and all expectations
What helped me going into this process, was that I did not have a set plan or idea (decoration wise). At the most, I knew I wanted it to be colorful. I wasn’t expecting anything from my school, which allowed for there to be no pressure on them or myself. It allowed me to think as freely as I could.
Step 2: Cultivate a vision and a vibe by asking yourself a few questions
Q1: How do I want my students to feel when they walk into this classroom?
Q2: How do I want to feel walking into this classroom to both work in and teach in?
Q3: What “must” I have in order to make this a functional space?
Step 3: Once your vision is set, ask for help
Ask your teachers, (ALL OF THEM) what extra items do they have that they can donate to you?
Ask your school director or whomever manages the school supplies, what items does the school have left over from the previous year?
Ask all the questions!
Step 4: Do a “Walk-Around"
Walk around your entire school, each room and see what they have. If you see anything that you like, take a picture of it or write it down and ask your school if they have any extras of that particular item. If your school does not have it on hand, ask where can you find it and what the price of it is – this way when you do receive the budget you’ll be a few steps ahead in planning out what you need to get.
Walk around your school and look to see if you can find any useful tools that you can borrow (stapler, glue gun, cutting board. laminator, etc) this will allow you to start building up a tool itinerary which will assist you in figuring out what DIY projects you can make.
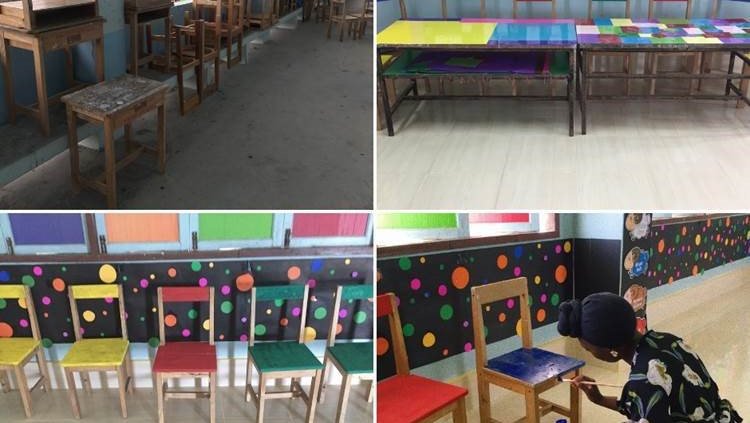
Also, walk around and check out what is being considered as “trash.” I was able to find old notebooks, that I now use for students who forget or lose their notebooks. I also found a few desks and chairs that I was able to give a facelift to. I painted the chairs with the leftover paint that I had from a mural that we painted, and I used paper and tape to cover the tables, super simple.
Step 5: Youtube and Pinterest
It goes without saying that these two sites are lifesavers for everyone. If you have an idea, nine times out ten, someone around the world had a similar idea. It does not hurt to be inspired by other creative thinkers and teachers! Work smarter, not harder.
Step 6: Plan and Prepare
Now that you have your questions answered, no expectations, and possibly a few more supplies and tools than before, start planning what you can do with what you have and proceed. Don’t overthink it, just do. If something doesn’t turn out how you imagined, there is always room to start over. When I first started decorating my classroom, I used a lot of my students work as both display and decor (it’s an amazing motivator that makes them feel good about the work they are doing in class). The issue with that was that many of the arts and crafts projects were made from paper and due to rainy season, many of the crafts/decor were ruined. I took them down, and had students create different crafts that were then laminated, moving forward they will be weather resistant. #ProblemSolved
If you look at my classroom’s before and after pictures you’ll notice a few changes that were obviously not “do – it – yourselfable”. I was gifted a few items by my school and other organizations that my school has partnerships with. To be honest I was not expecting any of it, and would’ve been fine without it, but it’s nice to have and it’s made teaching so much more fun. Again, not having any expectations really set me up to be appreciative of whatever the school decided to give me.
A list of items I was gifted (that made a huge impact on my room):
A new TV
A new laptop
Tile Floors
Reading Books (from friends and family back home)
Paint
I hope that I was able to inspire and encourage you to get a head start on revamping your classroom. According to an article on smithsysystem.com, “The impact color has on a room and its occupants is undisputed. For decades, interior designers have leveraged color to set a room’s purpose or mood. While often ignored in the classroom, color remains an important element to consider in any environment.” It doesn’t require much effort, but it does require willingness and patience. The tips and tricks that I have shared do not necessarily have to all be followed, it’s more of a guide to help you get started. It’s what helped me. Your students and teachers will be so appreciative, trust me. Another great way to look at this is, this classroom that you create will be here long after you leave – and every time the kids walk in to that room they will always have a piece of you!
Special thanks to PCV 127 Christopher Gardner for helping me draw and paint our infamous mural. It takes a team to make the dream happen.